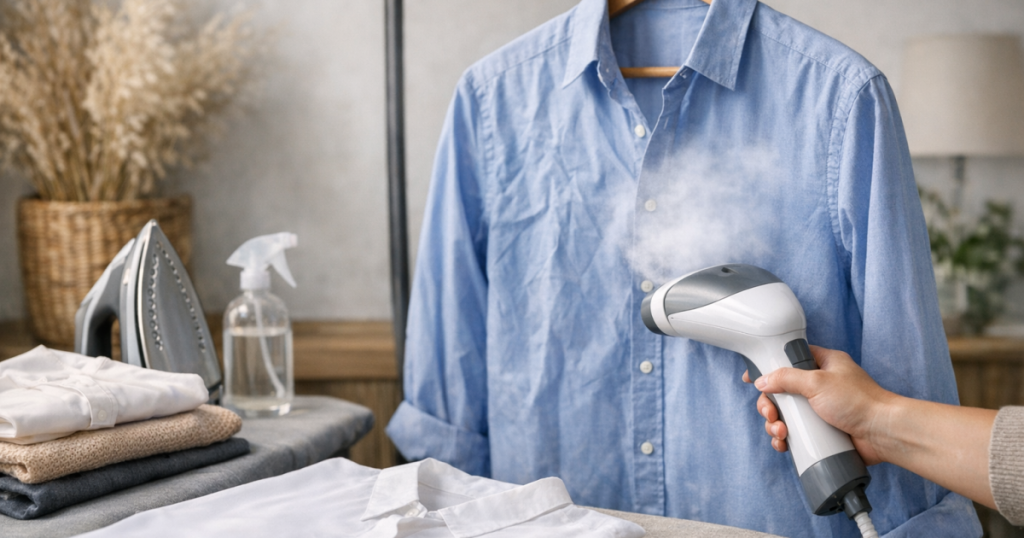
Steaming is one of the gentlest ways to relax creases, but it can leave damp rings, spotting or shiny patches if the fabric gets too wet. The safest way to steam creased clothes is to keep the steam moving, avoid direct water droplets and let the garment dry fully before wearing or storing it.
Water marks are usually caused by mineral residue, uneven drying, fabric finish, detergent build-up or a steamer that spits rather than produces a fine vapour. The fix is not more steam; it is better preparation and more controlled technique.
What to know first
- Use clean water and check the garment steamer or iron instructions before using deionised, distilled or tap water.
- Hang the garment where air can circulate, not flat against a door or wall.
- Keep the steamer head close enough to relax fibres but not pressed hard into the fabric unless the appliance instructions say it is suitable.
- Steam from the inside where possible on delicate, dark or mark-prone fabrics.
- Let the garment dry on a hanger before putting it on, folding it or placing it in a wardrobe.
Why steaming can leave water marks
Water marks form when part of the fabric dries differently from the area around it. On cotton and linen, this can look like a faint ring. On silk, viscose, satin and some synthetic blends, it can appear as a darker patch, a pale halo or a change in sheen. The mark is often not permanent, but repeated over-wetting can disturb finishes and make delicate fibres harder to restore.
Hard water is a common issue in many parts of the UK. Minerals in the water can dry onto the fabric or build up inside the steamer, increasing the chance of sputtering. Detergent residue can also react with moisture, so a garment that was not rinsed well may show patches as steam reactivates what is sitting in the fibres.
It is worth separating true water marks from other pale marks before you start. For example, white patches on black tops are often deodorant rather than steam damage; the removal method is different, so use a targeted approach such as removing white deodorant marks from black clothes rather than repeatedly steaming the area.
Set up the garment before you steam
Good results start before the steamer is switched on. Shake the garment out, fasten buttons or zips, and hang it on a sturdy hanger. A hanger that is too narrow can create shoulder bumps, while a flimsy one makes it harder to keep fabric under light tension.
Give the garment space. If it hangs against a painted door, mirror or wardrobe, the steam may condense behind it and dampen the back unevenly. A hook on a rail, shower screen or freestanding airer usually gives better airflow. Avoid steaming over carpet or soft furnishings if the appliance tends to drip.
Check the care label. Garments marked dry clean only, structured jackets, embellished fabrics, leather, suede and heavily tailored pieces need extra caution. Steam can soften interlinings, loosen adhesives or leave marks around trims. For washable shirts, blouses, dresses and lightweight knitwear, steaming is usually more forgiving than pressing, provided the fabric is not saturated.
Choose water that will not leave residue
Empty stale water from the tank if the steamer has been sitting unused. Refill with the water type recommended by the appliance manufacturer. Some steamers are designed for tap water, while others allow or recommend deionised or distilled water, particularly in hard-water areas. Do not add fragrance, laundry liquid, vinegar, essential oils or fabric conditioner to the tank unless the manufacturer specifically says it is safe; additives can spit, stain fabric or clog the appliance.
Let the appliance reach its working temperature before aiming it at clothing. A cold or half-heated steamer is more likely to spit droplets. Test the steam away from the garment first, ideally onto a towel or into the sink, until the flow is steady.
Use the right distance and movement
Hold the steamer head a short distance from the fabric for most garments, then adjust based on how the cloth responds. As a general starting point, keep it around 2–5 cm away for everyday cottons and synthetics, and further away for delicate or shiny fabrics. The aim is to expose fibres to vapour, not soak the surface.
Work in slow downward passes. Keep the head moving rather than hovering over one spot, because stationary steam can create a wet patch. Use your free hand to gently pull the hem or side seam to create light tension, keeping fingers well away from the steam. Do not steam a garment while someone is wearing it.
If a crease is stubborn, make two light passes instead of one heavy pass. Let the area cool for a few seconds between passes. Deep fold lines from storage may need a proper press rather than more steaming; for shirts in particular, it can help to understand when to use a garment steamer and when to iron. The guide to choosing between a clothes steamer or steam iron for shirts explains that distinction in more detail.
Fabric-by-fabric technique
Cotton shirts and poplin
Cotton can tolerate more steam than many fabrics, but it also shows damp patches clearly while drying. Start with the collar, button placket and cuffs, then move to the body. Keep the fabric taut and use repeated light passes. If the shirt is very creased, steaming may improve it enough for casual wear, but crisp collars and cuffs usually need an iron.
Linen and linen blends
Linen relaxes well with steam but creases again easily. Accept a softly rumpled finish rather than chasing every line with heavy moisture. Steam from the inside if the fabric is dark or richly dyed, and let it hang for several minutes afterwards so any temporary dampness evens out.
Silk, satin and viscose
These are the fabrics most likely to show water marks. Turn the garment inside out, hold the steamer further away and avoid direct contact. Test on an inner seam first. If the fabric darkens immediately or forms a ring as it dries, stop and use a more cautious method, such as hanging it in a steamy bathroom for a short time without wetting the surface directly.
Wool and fine knitwear
Steam can refresh wool and help relax creases, but too much moisture can distort shape. Lay the garment flat briefly after steaming or support it on a hanger that does not stretch the shoulders. Avoid pulling hard on wet fibres. For delicate cashmere, washing and drying technique matters just as much as crease removal, so handle it gently throughout its care routine.
Polyester and synthetic blends
Synthetics often respond quickly, so use less steam than you think you need. Keep the head moving and avoid pressing the plate or nozzle hard against the fabric, as some finishes can become shiny. Let the garment cool before judging the result; creases can continue to relax as the fibres settle.
A simple step-by-step method
- Check the care label: confirm that steam is sensible for the fabric, trims and construction.
- Fill with suitable water: use the water type recommended for your steamer or steam iron.
- Warm up fully: wait until steam is steady, then test away from the garment.
- Hang with airflow: leave space behind the garment so moisture can escape.
- Start inside out: this reduces the risk of visible marks on delicate, dark or shiny fabrics.
- Use light tension: pull gently at seams or hems without stretching the fabric.
- Steam in passes: move down the garment slowly, keeping the head moving.
- Blot accidental droplets: use a clean white towel and press lightly; do not rub.
- Air dry completely: leave the garment hanging until it feels dry and cool.
What to do if a water mark appears
Stop steaming that area. Let the garment dry fully first, because many apparent marks fade as the fabric equalises. Do not rub the patch, as abrasion can disturb fibres and make the mark more visible, especially on silk, satin and viscose.
If a faint ring remains on washable cotton or linen, lightly mist the surrounding area with clean water so it dries evenly, then hang it with good airflow. For delicate fabrics, test any correction on a hidden seam first. A clean, barely damp white cloth can sometimes feather the edge of a mark, but too much water will make the problem worse.
For silk, the safest routine is prevention. The same principles that help with washing silk pillowcases without water marks apply to silk clothing too: avoid uneven wetting, use gentle handling and dry the fabric evenly away from direct heat.
Checks that prevent repeat marks
- Clean the steamer regularly: follow the appliance instructions for descaling or rinsing the tank, particularly in hard-water areas.
- Avoid overfilling: an overfilled tank can increase dripping on some appliances.
- Keep the nozzle clean: wipe residue from the head when the appliance is cool and unplugged.
- Do not steam stained fabric: heat and moisture can set some marks or spread residue.
- Give clothes time to dry: putting a warm, slightly damp garment straight into a wardrobe can cause creases, odour and mildew.
- Use a clean towel behind small areas: for collars or pockets, a towel can absorb excess moisture and support the fabric.
Helpful questions
Can I use tap water in a clothes steamer?
Use the water type stated in your appliance instructions. In hard-water areas, mineral build-up can increase spitting, so deionised or distilled water may help if the manufacturer permits it.
Why does my steamer spit water onto clothes?
It may not be fully heated, the tank may be overfilled, the nozzle may have residue, or mineral build-up may be affecting the steam flow. Test the steam away from clothing before each use.
Should I steam clothes inside out?
Yes, for silk, viscose, satin, dark colours and delicate finishes. Steaming inside out lowers the chance of visible spotting or shine on the outer face.
Can steaming remove every crease?
No. Steam is good for relaxing light to medium creases, but sharp folds, collars, cuffs and heavily wrinkled cotton often need careful ironing for a crisp finish.
How long should clothes dry after steaming?
Leave them until they feel completely dry and cool to the touch. Lightweight garments may need only a few minutes, while thicker fabrics and seams take longer.
Final thoughts
Water-mark-free steaming comes down to control: clean water, steady vapour, light passes and proper drying time. Treat delicate fabrics as mark-prone, avoid saturating the surface, and correct the cause of any spitting before steaming your next garment. Done carefully, steaming is a useful way to refresh clothes between washes while protecting the fabric’s shape, finish and feel.