Satin looks luxurious because its smooth surface reflects light, but that same surface can show every crease, water spot and overheated patch. The safest way to remove creases from satin is to use moisture, low heat and a barrier cloth rather than pressing the fabric directly.
Before reaching for the iron, treat satin as a delicate finish rather than a single fabric type. Satin can be silk, polyester, acetate, viscose or a blend, and each one reacts differently to heat, steam and pressure.
The short version
- Check the care label first, because satin is a weave and not a fibre.
- Start with the gentlest method: hanging, bathroom steam or a garment steamer held away from the fabric.
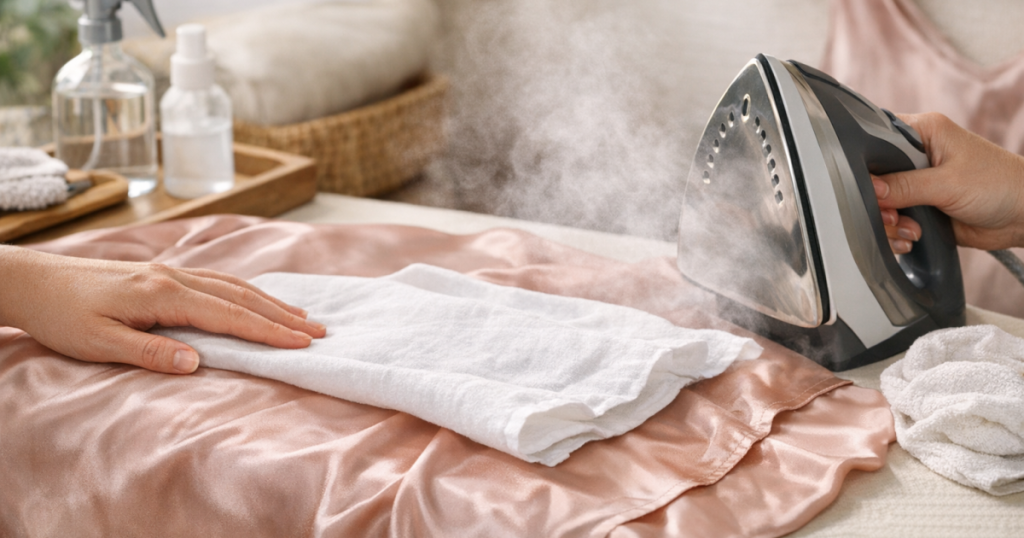
- If ironing is needed, turn the garment inside out and use a clean pressing cloth.
- use low heat, light pressure and short contact rather than dragging the iron.
- Keep the iron plate, steamer head and ironing board cover spotless to avoid marks.
- Never press seams, zips or hanger dents hard from the shiny side.
Why satin gets shine marks so easily
Shine marks happen when heat and pressure flatten or distort the surface of the fabric. On satin, the long floating threads on the face of the weave are designed to catch the light. When those threads are crushed, scorched or pressed unevenly, the area can look brighter, duller or patchy compared with the rest of the garment.
Direct ironing is the usual cause, but it is not the only one. A dirty soleplate, too much steam in one spot, hard seams underneath the fabric, or pressing over raised stitching can all leave visible changes. On darker satin, even a mild impression can look obvious because the surface reflects light so sharply.
The goal is not to make satin flat at all costs. It is to relax the crease while preserving the smooth surface. That is why patience, distance and a protective layer matter more than high heat.
Step 1: Check the label and test a hidden area
Read the care label before adding steam or heat. Polyester satin is often more tolerant than silk satin, while acetate and some viscose satins can be more vulnerable to water marking and heat distortion. If the label says dry clean only, avoid full washing and keep any home treatment very cautious.
Test on an inside seam allowance, hem or concealed facing. Add a little steam from a distance, wait until the fabric is fully dry, then check in natural light. Look for water rings, dull patches, colour change or surface rippling. If the garment is bright, dark or printed, it is also worth using the same cautious approach you would use when you test clothes for colourfastness before washing.
Do not skip the drying time when testing. Satin can look fine while damp, then show a faint tide mark or texture change once dry.
Step 2: Let gravity do some of the work
For light creasing, hang the garment properly before using heat. Use a smooth, padded or broad hanger so the shoulders are supported without creating new dents. Button or zip the garment so it hangs in its intended shape, then leave it in a warm, dry room for several hours.
If the satin item has a bias cut, a heavy skirt or delicate straps, avoid hanging it in a way that stretches the fabric. Lay very fragile pieces flat over a clean towel instead, smoothing creases gently with your hands. This will not remove deep folds, but it reduces the amount of heat or steam needed later.
Step 3: Use gentle steam from a distance
Steam is usually safer than direct ironing because it relaxes fibres without crushing the satin face. Hang the item, hold the steamer or steaming iron a short distance away, and work slowly from top to bottom. Keep the nozzle moving so moisture does not build up in one patch.
Do not press the steamer head against satin unless the care label and a hidden test show it can cope. Contact steaming can leave shiny tracks, especially on dark polyester satin and delicate silk satin. If the garment starts to look wet rather than lightly misted, stop and let it dry before continuing.
A steamy bathroom can help with mild creases, but keep the garment away from direct splashes and condensation. Shut the door after a hot shower, hang the garment where it will not touch damp walls, and then move it to a ventilated room to dry fully. For more detailed technique on distance, movement and moisture control, see our guide to steaming creased clothes without leaving water marks.
Step 4: Iron only when steam is not enough
If creases remain, ironing can work, but the method is important. Set the iron to a low or silk/synthetic setting according to the care label. Empty or reduce steam if the fabric is prone to water marks, and make sure the soleplate is clean before it touches the pressing cloth.
Turn the garment inside out wherever possible. Place it on a clean, smooth ironing board with no ridges, crumbs or old starch residue underneath. Lay a dry, clean pressing cloth over the creased area. A plain white cotton tea towel, cotton lawn cloth or muslin square can work, provided it is colourfast and free from texture that could emboss the satin.
Lower the iron briefly, lift it, then move to the next section. Do not scrub, slide or grind the iron across the cloth. Short lift-and-press movements reduce friction and stop the satin surface being dragged out of shape. Let each section cool flat before moving it, because warm satin can pick up new creases quickly.
Step 5: Handle seams, hems and details carefully
Seams and hems are common places for shine marks because they create raised lines underneath the fabric. If you press hard over them from the front, the seam allowance can print through as a glossy ridge. Work from the wrong side and use a sleeve board, rolled towel or small pressing pad where needed so the crease can relax without flattening bulky areas.
For pleats, darts or structured areas, align the garment carefully before steaming or pressing. Satin shows wonky handling, so do not pull a crease out of shape. Encourage the original line rather than creating a new one.
If the satin has beads, sequins, embroidery or glued decoration, avoid direct heat on the embellishment. Steam from the reverse where possible, keep the garment supported, and do not let weighty details hang while damp. The same gentle handling principles apply when you clean beaded dresses without loosening embellishments.
What to avoid
- High heat: it can melt, scorch or permanently flatten satin fibres.
- Direct pressure on the shiny side: this is the quickest route to glossy iron marks.
- Spraying water onto the face: some satins develop rings or dark patches as they dry.
- Using a patterned towel as a pressing cloth: texture can transfer as an unwanted imprint.
- Ironing over stains: heat can set residues and make marks harder to remove.
- Rushing storage afterwards: warm or slightly damp satin will crease again if folded too soon.
How to deal with stubborn creases
Deep fold lines from packaging or long-term storage often need several gentle passes rather than one aggressive attempt. Steam lightly, let the fabric dry and cool, then reassess. If the crease is still visible, use the pressing cloth and low heat method for a few seconds at a time.
For a satin dress or blouse with creases across the front, work in small sections and support the fabric so it does not fall off the board while warm. For satin trousers or skirts, press from the inside and avoid creating a sharp crease unless the garment is designed to have one.
If a shine mark has already appeared, stop ironing immediately. Brush the area very gently from the wrong side with a soft cloth, then steam lightly from a distance and let it dry. Some pressure shine can soften, but heat damage or melted synthetic fibres may be permanent.
Drying and storage after crease removal
Once the satin is smooth, leave it hanging in open air until completely dry and cool. Do not put it straight into a wardrobe while it still holds warmth or moisture, as this can encourage new creasing and musty smells.
Store satin with room around it, not crushed between heavy coats or textured garments. For occasionwear, use a breathable garment bag rather than a plastic dry-cleaning cover. Fold only when necessary, and place acid-free tissue or a clean soft cloth along fold lines to reduce hard creases.
Helpful questions
Can I iron satin on the shiny side?
It is safer not to. If there is no alternative, use the lowest suitable heat, a clean pressing cloth and almost no pressure. Test first and lift the iron rather than sliding it.
Is steam always safe for satin?
No. Some satin, especially silk, acetate and certain viscose blends, can water mark. Test a hidden area and use light steam from a distance rather than soaking the fabric.
How do I remove packing creases from a new satin dress?
Hang it for several hours first, then steam lightly from the reverse or through the lining if possible. Use low-heat pressing with a cloth only for creases that remain.
What pressing cloth is best for satin?
Use a clean, smooth, white cotton or muslin cloth. Avoid coloured, fluffy or textured fabrics because they can transfer dye, lint or surface impressions.
Can shine marks be fixed?
Mild pressure shine may reduce with gentle reverse-side steaming and cooling. Scorching, melting or fibre flattening from high heat is often permanent.
Main lessons
Satin rewards a light touch. Start with hanging and gentle steam, test before adding moisture, and keep direct iron contact away from the shiny face. When pressing is necessary, use low heat, a clean barrier cloth and short lift-and-press movements. The less force you use, the better the chance of removing creases while keeping satin smooth, even and mark-free.